Introduction
In the world of lashes, it’s not just about the length or the curl—it’s the hold, the finish, and the longevity that truly make your look feel salon-professional. For anyone applying lash clusters at home or in a salon setting, the right adhesive is absolutely critical. That’s where high-quality lash cluster glue becomes your best friend. Let’s dive into how the right glue can elevate your lash game from good to exceptional, and what to look out for.
Why Lash Cluster Glue Matters
When you wear lash clusters—those little groups of lashes applied under your natural lash line—the adhesive is doing the heavy lifting. It’s securing each cluster, keeping it in place, resisting oils and moisture, and maintaining comfort. A slip-shod glue means early lift, curling away, gaps, and a look that fades quickly.
By contrast, when you invest in a premium lash cluster adhesive, you get:
- Secure adhesion: the clusters stay firmly attached so your lash line remains flawless.
- Lasting wear-time: fewer mid-week touch-ups, fewer missed lashes, more longevity.
- Better finish: clear drying, minimal residue, smoother appearance.
- Comfort: less tug, less irritation, better all-day wear.
So yes—as the title says, lash cluster glue is your key to salon-quality lashes that last.
What to Look for in a Good Lash Cluster Adhesive
Before we dive into the specifics of what Aera Lashes offers, it’s helpful to know the markers of strong performance in any lash cluster glue:
- Dry time & setting
Fast-drying glue means you don’t have to hold the cluster in place for too long. Yet it shouldn’t dry so fast that you can’t properly position the cluster. A balance is key. - Wear time / longevity
The best glues advertise wear of multiple days (or even up to 10 days) under typical conditions—good for home use or light salon sessions. - Finish colour
A clear-drying glue is great for a clean finish, especially if you’re applying under the lashes rather than on a thick strip. If it starts white or coloured but dries clear, even better. - Resistance to oils / moisture / sweat
Real-life conditions: skin oils, make-up remover, humidity, maybe even a bit of mist. A quality glue holds up. - Comfort & safe formula
Because you’re near the eye, minimal fumes, gentle formula, no tug or discomfort = a win. - Application design
Often good glues come with a refined brush or wand, making precise placement easier—especially with clusters.
The Aera Lashes Cluster Glue Experience
Turning to Aera Lashes, their site highlights several elements of their cluster adhesive that check these boxes:
- They promote a “10 Day Adhesive” for cluster lashes—meaning the wear-time is built into the marketing.
- They note that customers report long wear: one review says “Long time (4-5 years) lash cluster wearer, very happy with longevity of this glue. Dries down quickly and works better than the glue I was using previously… First use I got 9 days wear…”
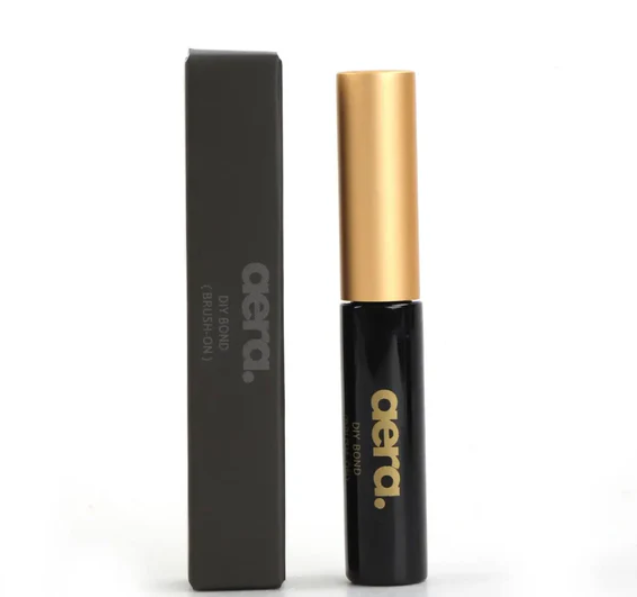
- Their “Clear Brush Wand Lash Glue” is called out by customers for its “white glue dries clear so it gives it a better finish over the black glue in my opinion.”
- The site also emphasises the concept of “Lashes That Last” and positions their adhesive as enabling up to 10 days of wear when using their clusters.
All of this demonstrates how the right adhesive merges the technical performance (hold, finish, durability) with user experience (clear finish, comfortable wear).
How to Apply Lash Clusters & Glue for Salon-Quality Results
Using a high-quality cluster glue gives you a strong foundation—but technique matters too. Here’s how to get the best outcomes:
1. Prep your natural lashes
Cleanse your lash line to remove oils or make-up residue. Set a tacky primer if included or recommended (some brands offer a lash-prep step). A clean surface = better adhesion.
2. Dispense the glue
Squeeze out a small amount of the cluster glue onto a lash tile or palette. If the glue includes a brush wand (like Aera’s Clear Brush Wand), use that to pick up a bit of adhesive. Less is more—apply a thin, even layer to the base of the cluster.
3. Apply the lash cluster
Using tweezers or an applicator, pick up a cluster and place it just under your natural lash line, adhering it to your real lashes rather than your skin. Press gently and hold for a few seconds until it sets.
4. Work methodically
Apply clusters moving from outer to inner or in small sections, depending on your style. Ensure consistent spacing and alignment for a professional look.
5. Allow setting time
Even with quick-dry adhesives, allow a few minutes before touching or applying make-up. This ensures the bond is engaged.
6. Maintain wear
Advise clients or follow oneself: avoid oil-based makeup removers near the lash line, gently brush your lashes daily, and resist tugging. With good glue, you should get several days of wear.
Benefits You’ll Notice Immediately (and Over Time)
Switching to a strong lash cluster adhesive delivers tangible & delightful benefits:
- Cleaner look: the clusters appear naturally integrated because the glue dries clear and blends seamlessly.
- Longer wear: instead of needing reattachment after a day or two, you’ll get extended life out of the set.
- Less irritation: better adhesives minimise lash-lift discomfort and reduce the likelihood of early lift-offs.
- Confidence: whether you’re a lash tech or doing at-home kits, knowing the glue will hold gives peace of mind.
- Cost-effectiveness: fewer replacements, fewer touch-ups means less spend in the long run.
Bringing Salon-Quality to Your At-Home or Studio Set-Up
If you’re a lash tech, offering cluster lashes with a high-end adhesive can elevate your service. If you’re doing your lashes at home, choosing a tried-and-tested glue empowers you to achieve professional-grade results. Here are some practical tips:
- Invest in a good adhesive (don’t cut corners).
- Train in application technique or follow a reliable video tutorial.
- Use quality clusters and tools (tweezers, mats, remover) to complement the glue.
- Educate clients (or yourself) on aftercare: avoiding oil-based products around the eyes, using gentle cleansers, brushing lashes daily.
- Maintain hygiene and storage: keep the glue capped tightly, store in a cool dry place, discard old adhesive as per manufacturer guidelines.
Why Your Lash Game Will Be Better With the Right Glue
It comes down to two things: performance + trust.
Performance: You need the adhesive to deliver—quick setting, strong hold, clear finish, wear longevity. Without it, your clusters may lift, shift, or look messy.
Trust: Whether you’re the one applying or the recipient of the service, you want confidence that the lashes will last without mid-week mishaps, gaps, or early fallout. Good glue gives you that.
When you combine these with proper application and care, the result is lashes that look like you just walked out of a salon—even if you did it yourself. That flawless, lush lash line that lasts days, not hours.
Common Questions & Troubleshooting
Q: My clusters still lift before 10 days—what’s wrong?
A: Check that your natural lash surface was clean and oil-free. Too much adhesive or uneven placement can also cause lift. Ensure you’re using the glue’s recommended setting time and that you’re applying to the lashes (not skin). Even the best glue can struggle if technique or prep is weak.
Q: Can I use any lash glue for clusters?
A: Technically you might, but adhesives not designed for cluster lash use may dry too slowly, lack strong hold, or have residue that shows. It’s better to use a glue formulated for cluster lashes (such as ones built for wear up to 10 days).
Q: How do I remove clusters safely?
A: Even with high-quality adhesives, proper removal matters. Use an oil-free remover around the base of the cluster and gently slide off—never tug. Follow the brand’s removal instructions to preserve natural lashes and make re-application easier.
Q: Is clear or black glue better?
A: It depends on your lash band colour and application techniques. Clear glue dries invisible (great for natural look), while black glue can help invisible lash bands blend in with natural lashes. Aera’s users praise their “white glue dries clear” finish.
Conclusion
In the lash-world, the product that often gets the least glamour but the biggest impact is the adhesive. It’s literally what holds everything together. Choosing a premium cluster glue makes the difference between “just okay” and “wow-serious lash game”.
With a high-quality product (for example the offerings from Aera Lashes designed for up-to-10-day wear and praised for quick dry and clear finish) you set the stage for lash clusters that behave like extensions. From better finish and longer wear to less stress and more confidence—your lash experience transforms.
So whether you’re dressing up for an event, offering a service at a studio, or simply want your at-home application to look and feel professional—remember: your glue matters. It’s the foundation of your look. Use one that’s built for lasting performance, apply it correctly, and let your lashes speak volumes.